 |
|
 Sep 24, 2006, 08:17 PM // 20:17
|
#1 |
|
Wilds Pathfinder
Join Date: Sep 2005
Location: 7°13'35" E - 50°06'27" N
Guild: Servants of Fortuna [SoF]
|
The aim of this article is to show people the technical aspects of taking screenshots. It is kind of a more detailed version of the HOW-TO GUIDE: Taking & Posting Screenshots or Videos (only covering the part of taking screenshots, though). Many of the things described herein could be considered obvious. Others may be considered trivial. However, many screenshots I see in this forum and other places are not very good, from a technical point of view. People keep making the most basic mistakes. And if I can help to remedy that, so be it… Still, I am no expert at image editing, graphics design or photography. These things will not be covered in this guide in it's current version. For help on those, you should rather look at threads like Bethany's Gallery and Image Workshop or Xen's quick and dirty screenshot cutout guide.
Sometimes you will find yourself in a situation where you want to take a quick snapshot of something funny that's just happening, or you may need proof of a scam or abuse to report to ANet. In those cases there may be no time for anything else but to quickly hit the button, it may also not be relevant if the screenshot actually looks good, as long as you can see what it is about. But what if you finally got yourself that longingly desired Fissure armor or you just found this really amazing weapon and want to show it off on the guru forums? Right, you want it to look good. You should be aware that you have the full control over how good your screenshot will look. So here we are: Basics Whenever you press the "Print Screen" button on your keyboard, the game will save the current content of your screen as a bitmap file on your hard drive. The location where those files are stored is the folder "Screens" in your Guildwars directory (usually C:\Program Files\Guild Wars\Screens\). Screenshots are automatically numbered from gw001.bmp to gw999.bmp. The game will never overwrite a previously taken screenshot. Once the number of 999 is reached, it will start filling gaps in the numbering which may be there if you have deleted older screenshots. After that, you will get the error message "Your screenshot folder is full", when trying to take more screenshots. Also take heed of hard disk space, as bitmaps are uncompressed and a large number of them can easily amount to several gigabytes. So weed out shots that you don't need anymore and / or archive your screenshots in a different location. User Interface By pressing Shift+Print Screen, you will take a screenshot without the user interface. You can also toggle the interface off and on by pressing Ctrl+Shift+H. Hiding the interface will remove all interface components, including the black bars at the top and bottom of the screen during cinematics, character selection buttons in the login screen, text messages - everything except for the pure game graphics. However, turning off the interface with Ctrl+Shift+H will not hide target selection markers. Also, if your mouse pointer hovers over objects or characters that can be selected, it will make them glow, possibly covering details. To get rid of these effects, you have to use Shift+Print Screen. The mouse pointer itself will never be included in the screenshot, though. 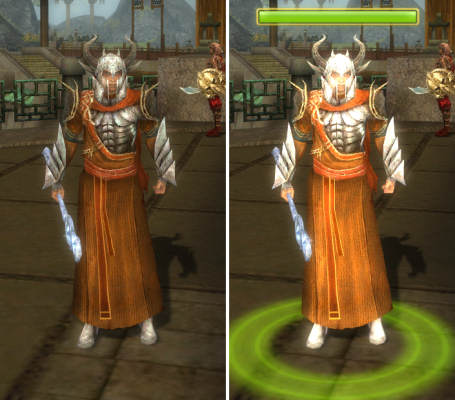 With both screenshots, the mouse pointer was positioned over the character. The left screenshot was taken with Shift+Print Screen. Details The most obvious thing to take influence on the quality of your screenshots, one would think, are the graphics options of the game. This is only true in a limited fashion, because the game will momentarily improve the image quality when a screenshot is taken. Even if your graphics options are set to the lowest levels, the game will apply highest settings upon taking a screenshot. Actually, even with highest settings, the quality of a screenshot may still be enhanced. During gameplay, the game replaces distant objects with sprites with a very low resolution, to improve performance. Only if you come close enough - or if you take a screenshot - those objects will be shown as three-dimensional rendered models. Because of this feature you may notice a short pause during gameplay when taking a screenshot. Depending on your settings and the performance of your computer, the screenshot may take place a split second after you press the button. This is important to know when taking screenshots of moving objects, such as fighting or dancing characters. 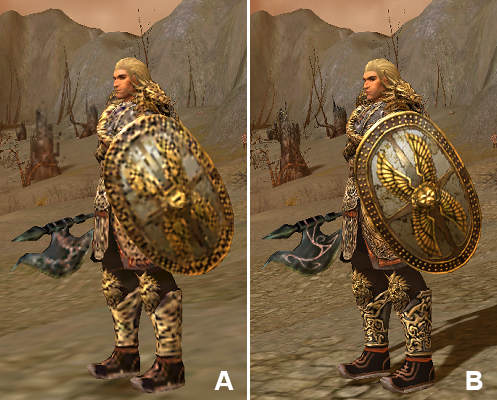 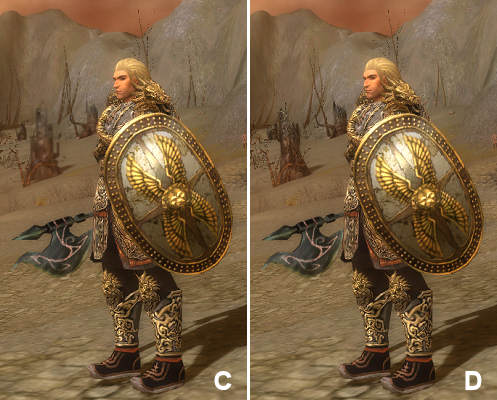 Image A shows what the game looks like with lowest possible settings. This image was taken with an external application, because if you have Guildwars take a screenshot with those settings, it will look like image B. The images C and D show the highest possible settings. Again, C was taken with an external application and shows what you see when playing the game compared to what a screenshot will look like (image D). Note the difference in the tree stumps in the background behind the character. Also note that the only differences between image B and D come from the different anti-aliasing and post-processing settings. However, this feature has one exception: In towns, outposts and guild halls (i.e. all non-combat areas) all player characters except for one's own character will only be shown with medium texture quality at best. Because of this you should enter a combat area, whenever your screenshot features more than one player character. 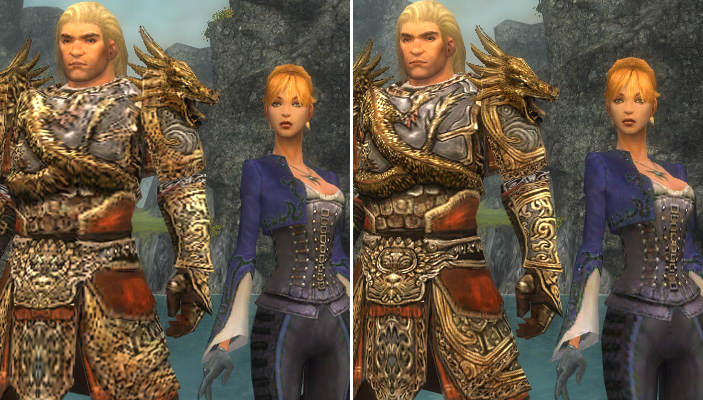 Both screenshots were taken with highest settings. The left screenshot was taken out of the view of the female Mesmer's player, the right image out of the view of the male Warrior's player. Note the difference in the details of the armor of each character. Out of the Mesmer's view, the Warrior's armor has a lower resolution and vice versa, while each player sees his or her own character in high quality. There are some setting that are not overridden and do have effect on the quality of screenshots (note that those options may not be availible if your graphics card is an older model): Anti-aliasing makes the edges of objects look smoother. Without it, edges may look jagged, depending on your screen resolution (the lower the resolution, the more noticeable the effect). Anti-aliasing is quite performance-hungry, so many gamers prefer to keep it switched off, for the sake of a better frame rate. But when you want to take a really good looking screenshot, consider enabling anti-aliasing for this even if it may bring your computer down to it's knees, you can always disable it again afterwards. 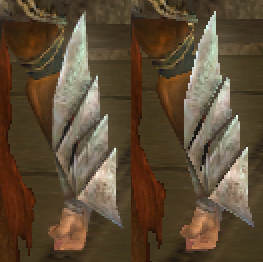 This section was magnified by 200% to make the effect more noticeable. The left image shows 4x anti-aliasing, the right image no anti-aliasing. Post-Processing effects will slightly blur and add a "glow" to objects. It is a matter of taste whether you find if it actually improves the image quality. The amount of glow depends on the object and the lighting and can be strong enough to make bright objects lose details. It is best to experiment with this setting for each screenshot. 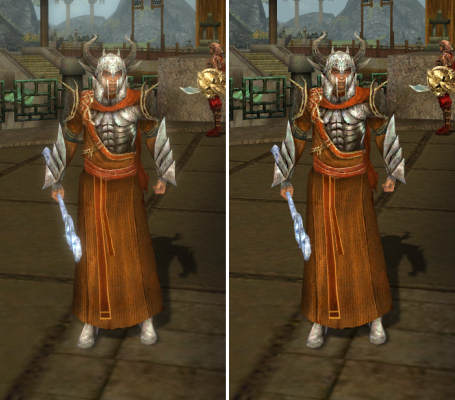 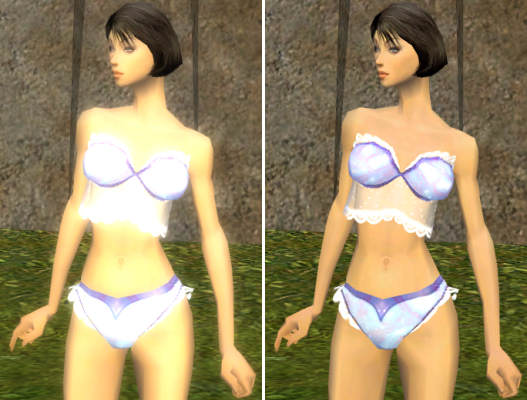 The effect isn't very noticeable on the Guide's armor (left image shows post-processing effects enabled, the right disabled). The female Elementalists underwear and skin, however, are prime examples on shininess. The strong gloss added by post-processing effects (left image) will outshine everything else. But without the effects (right image), objects tend to look "dull" and more artificial. The resolution should simply be as high as possible. Don't go over the top, though, as you may want to be able to handle, edit and upload the screenshot afterwards. The resolution has a massive impact on file size. Lighting (listen up now, this part is important!) The absence of light is shadow. Usually, you do not want too much shadow, because shadow covers up details, especially on objects that already are dark. Turn your character and camera position so that your character faces the light or at least has the light coming from the side, never from the back. If you have shadows enabled in your graphics options, you can use those to determine the direction of the light (note that turning off shadows in the options will only remove the shadow your character casts on the ground, the side that is turned away from the light will still be dark). Other than that, light always comes exactly from the west, no matter where you are (Tyria, Cantha, Elona, Battle Isles…). NPCs will turn towards player characters, when talked to. You can use this to make them turn to the light. 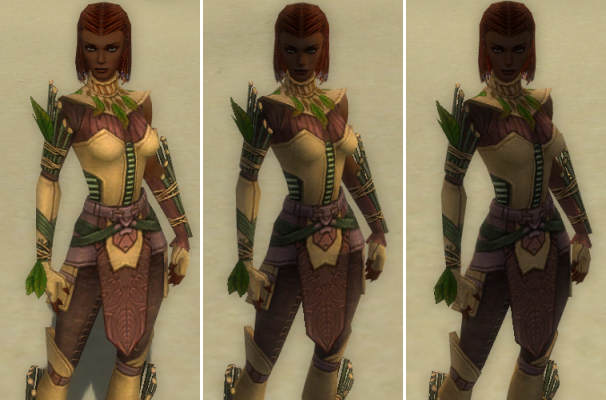 All three images were taken at the same location. On the left picture the character was facing to the west, on the middle picture she was facing north and on the right picture she was facing east. The facial features and details of the armor of the character are clearly discerned when she is facing the light, but it is increasingly more difficult to make out details the more she is covered in shadow. While the light comes always from the west, there are some properties about the light that change, depending on where you are. One thing is not the direction of the light, but the elevation of the light source, e.g. how high the sun is standing above the horizon. If the light is coming from straight up it will cause shadows under protruding objects, like body parts and structures on the armor. 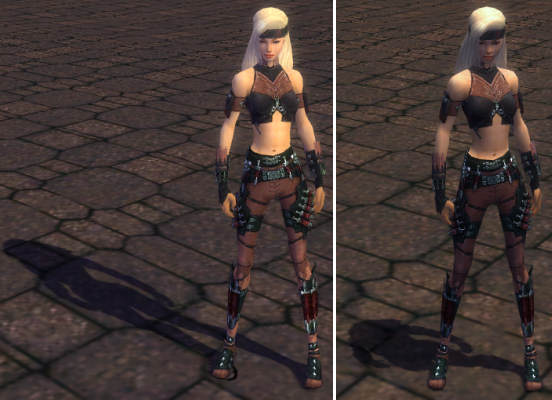 Note the lengths of the character's shadow on the ground. With the light coming from a higher elevation (right image), the top of the characters head, shoulders and hips are lit brightly, while her face, stomach and legs are shadowed. In many places the light is colored. The intensity of this tint varies from almost not noticeable to very heavy and ranges throughout the whole spectrum, from purple over blue, green and yellow to red, always depending on where you are. There are areas with neutral, white light, too, like the Isle of the Nameless, Yak's Bend and the Traveler's Vale, for instance.  All five images show the same character with the same pure white guild cape facing into the same direction. The screenshots were taken with post-processing effects turned off, note that turning them on may enhance coloration effects in some areas. Last, but not least, the brightness of the light may vary, too, depending on where you are. It is always night during the Riverside Province mission, for example. Taking screenshots in dark places, with backlight or with colored light may look nice if the effect is desired, but it may also be a disturbing factor. For pure documentary screenshots, you'd usually prefer an area with neutral light. Environmental Effects Some areas in the game feature weather effects like fog, snow or rain. In the Shiverpeaks, characters will have white breathing clouds in front of their faces. Fog will only impair the visibility of distant objects, so usually it isn't much of a concern. Breathing clouds can be avoided by taking screenshots between breaths. But there is no way to get rid of snowflakes or raindrops, other than moving to a different area. Monsters Unfortunately, monsters will rarely be cooperative to photographers, as they tend to hit them with sharp or heavy objects or throw nasty spells at them. This makes it very hard to get a clean shot, which is not impaired by flashing lights or other optical effects. Again, this may be desired. But if not, you can use the Monk skills Pacifism and Amity to make hostile creatures hold still for a couple of seconds. Note that while under the effect of those hexes, creatures will have a little symbol circling around their bodies. You may want to time taking the screenshot so that it is hidden behind the creature. Final notes: This guide is not the one and only truth. I wrote it from my personal experience, without, as mentioned, any real knowledge in image editing, simply because bad screenshots are a pet peeve of me. If you find any errors or something important missing, please tell me so I can edit. Thank you for reading. 
|

|

|
 Sep 24, 2006, 08:22 PM // 20:22
|
#2 |
|
The Humanoid Typhoon
Join Date: May 2005
Location: UK
Guild: Servants of Fortuna [SoF]
Profession: R/
|
Great guide mate!
I've edited the title slightly and place this one sticky. Good work 
|

|

|
 Oct 03, 2006, 09:15 AM // 09:15
|
#3 |
|
Wilds Pathfinder
Join Date: Sep 2005
Location: 7°13'35" E - 50°06'27" N
Guild: Servants of Fortuna [SoF]
|
Now how could I forget that? I added a note and example picture about the texture quality limitation in non-combat areas.

|

|

|
 Oct 16, 2006, 12:20 PM // 12:20
|
#4 |
|
Forge Runner
Join Date: Apr 2006
Location: Western Australia.
Guild: Crystal Mountain [CM]
Profession: W/
|
Very nice detailed guide there.
~Old 3fl |

|

|
 Nov 09, 2006, 03:14 AM // 03:14
|
#5 |
|
Frost Gate Guardian
Join Date: Nov 2006
Location: I was born in Tyria, precisily in the town of Ascalon, but lately i 've been living in Elona.
Profession: E/Mo
|
That guide rox! I didnt know about the ctrl+shift+h stuff, so most of my ss kinda sux so far... i used to screen shot and edit it, cutting the game interface parts. Ive tried to take all stuff off using game options and it kindda worked, except for the compass and the trouble organizing all screen again after i was finished. Buuuut.... better learning this now than never learning.
|

|

|
 May 18, 2008, 12:08 PM // 12:08
|
#6 |
|
Lion's Arch Merchant
Join Date: Nov 2006
Location: On A Chair
Guild: Rise Of Corruption
Profession: Mo/
|
Cheers mate
 been trying to capture some good snaps of aatxes for ages, never thought of using pacifism lol :P been trying to capture some good snaps of aatxes for ages, never thought of using pacifism lol :Pgreat guide 
|

|

|
 May 18, 2008, 12:12 PM // 12:12
|
#7 |
|
Wilds Pathfinder
Join Date: Jan 2007
Location: England (GMT)
Guild: The Imperial Guards of Istan [TIGI]
Profession: R/
|
nice! good work mate, actually answered a few questions of mine

|

|

|
 |
|
«
Previous Thread
|
Next Thread
»
| Thread Tools | |
| Display Modes | |
|
|
All times are GMT. The time now is 11:28 PM // 23:28.


 Linear Mode


